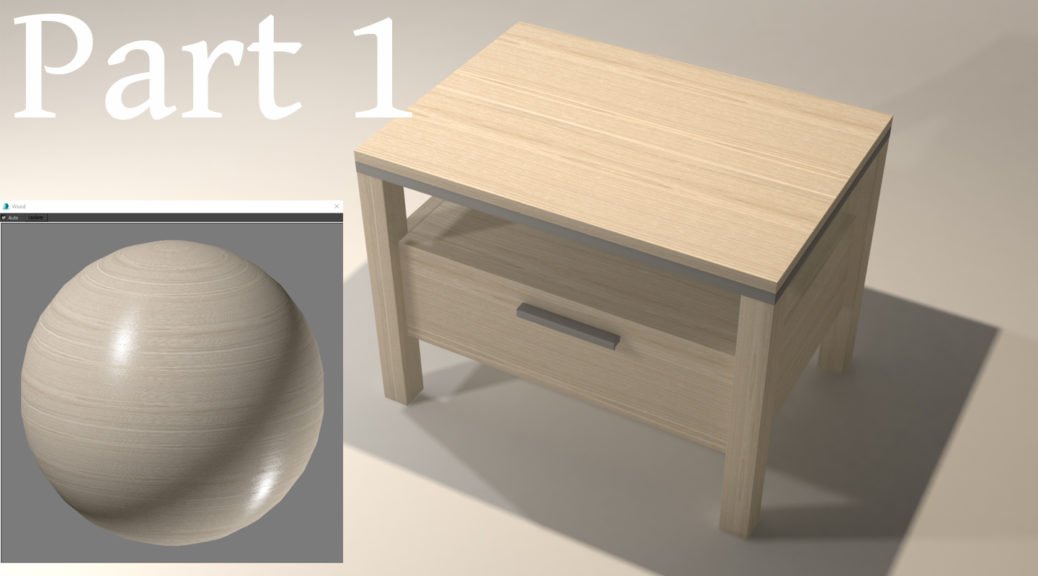
Standard Wood Material in 3ds Max Tutorial Part 1 (Creating Textures)
As you may (or may not) already know, that I have modeled my own apartment in 3ds Max. Logically I had to built quite a lot of objects that require Wood material. As I did this with the idea, that I had to import the whole mesh into Unity I didn’t try to do something fancy, because Unity (and any other 3D engine, I believe) best supports (if not only) objects with Standard material applied to them.
Unity simply won’t “understand” Vray materials or any other complex materials so it is best recommended to built models with Standard material for the easier import process and simpler further management (is management the right expression?.. 🙂 ). Since I already did my own research and combined various methods I decided to share with you what I found to be the best Standard Wood material for me. This is my first ever tutorial, but I’ll try to do my best at explaining everything as clear as possible:)
Why Create material, when you can just put a texture on an object?
For a long time, while I was learning the basics of 3D I thought that too. Of course it is the most easiest and basic solution. To apply unmodified Standard material and load some bitmap and you are done. But if you seek for more realistic result you just might want to tweak your material a little bit more. Material is responsible for the whole realism, the way light reacts to an object. If you are making some interior scene with the close-up shots, you definitely would want wood materials (or any other material in that matter) to look as realistic as possible. Or even if you are modeling an object for sale, this is a must, for more smooth and more pleasant to eye renderings.
Preparing the textures
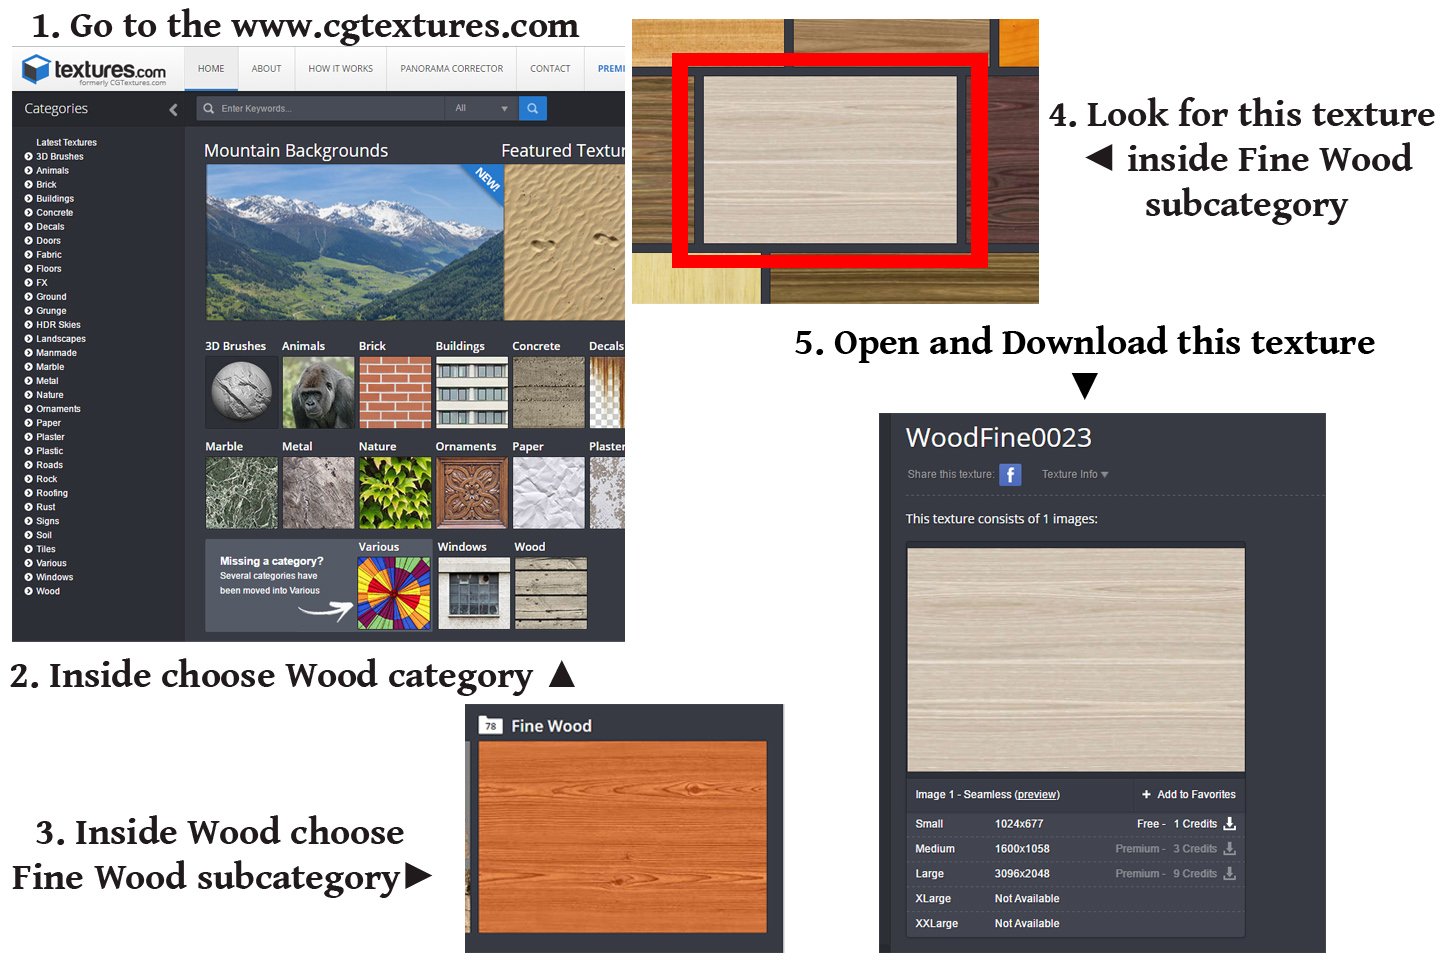
Just before beginning to tweak anything just prepare your texture maps in advance, so you could easily create your material without jumping from 3ds Max to Photoshop (or any other photo manipulation program you use). So for this tutorial you will need a Diffuse, Specular Level, Glossiness, Bump and Reflection maps. Cgtextures.com is my favorite site for free textures. I will use this wood texture for this tutorial. You just need to register in the site and you can download it for free. Or search Google for other wood textures, it’s up to you.
Creating Diffuse map
Once you downloaded this texture go to Photoshop (I’m using CS4) open the downloaded texture. Under Edit find and press Define pattern option and click the OK button on the dialog box. You have created a new pattern for the Paint Bucket tool. Click on Paint Bucket Tool. In upper toolbar choose Pattern option instead of a Foreground and in the next option bar select the wood pattern we saved few moment ago. Now create a New file inside the Photoshop. Rename it to Wood_Diffuse (Or something that is better for you). Make the resolution of 300, 2048x2048p the most optimal size for a texture in my opinion. Since we already have selected the wood pattern, just use the Paint Bucket tool on the Wood_Diffuse file. And there you have your Diffuse wood map. To be clear Diffuse map replaces the diffuse color of material to the diffuse color of a map. (Please note: this Paint Bucket tool technique will work only if the use texture is tileable!) Save the Diffuse map in your 3ds Max project file folder-> Sceneassets->Images. I always choose the .png format for the more crisper and clearer result. (Do not close the saved texture window as we will use it for creating other maps).
Creating Reflection map
We will tweak this Wood_Diffuse map to create the Reflection map. For Reflection map we need to create a more saturated version of our Diffuse map so that our Wood material would be more life like. In the upper panel go to Image-> Adjustments-> Hue/Saturation dialog. Inside set the Hue parameter to 8+ and Saturation to 55+ and click OK. This will be enough for our Reflection map. Save the image to the same file folder as the Diffuse map before. Just don’t forget to rename the file to Wood_Reflection. (Do not close the saved texture window as we will use it for creating other maps).

Creating Specular level and Glossiness map
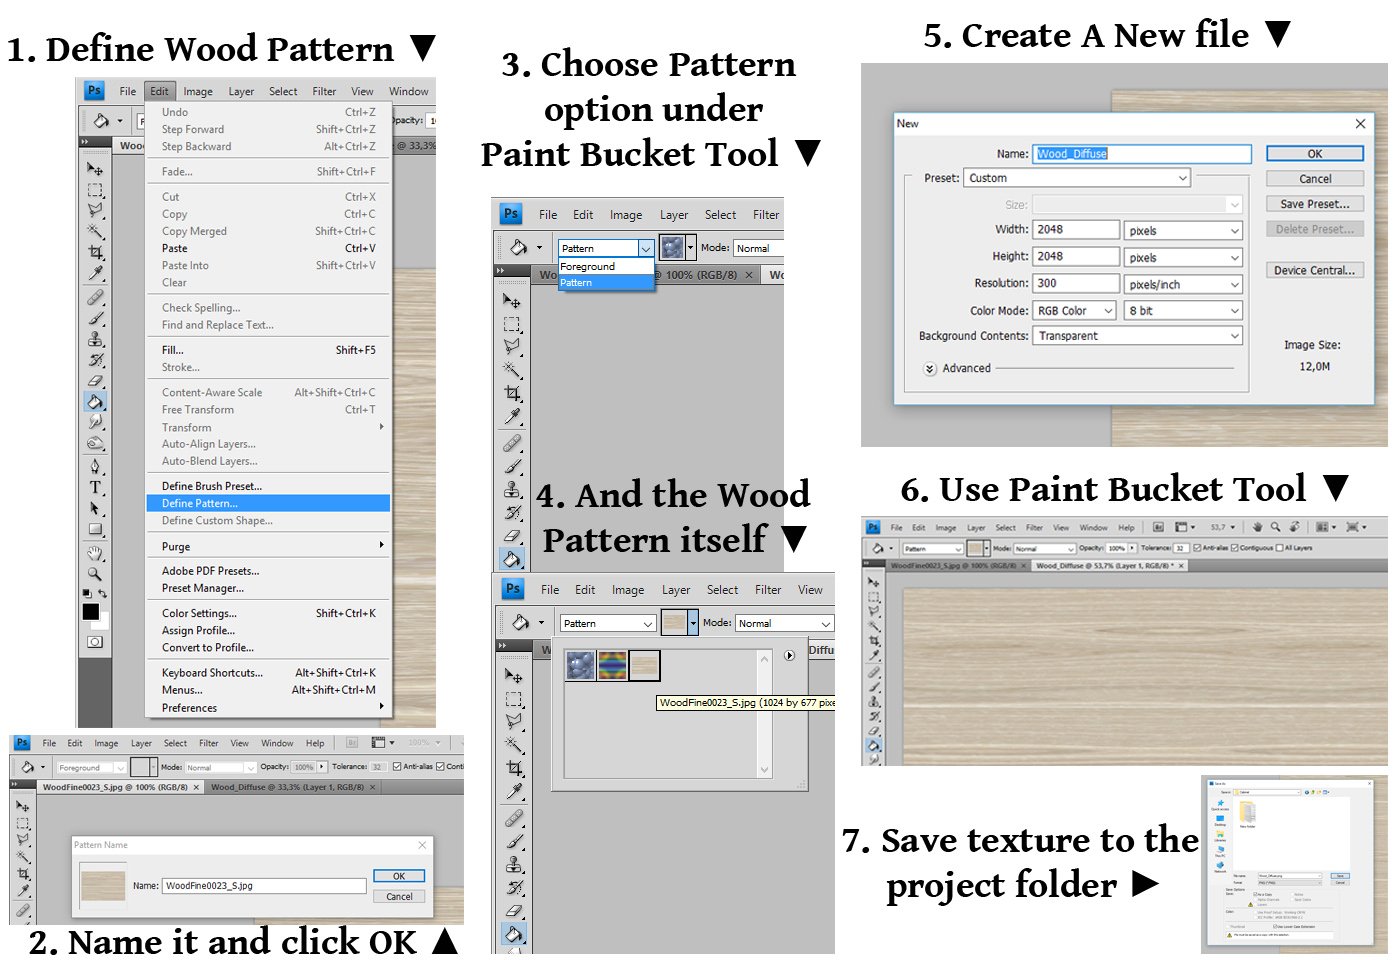
For Specular Level and Glossiness maps we will be creating and using the same bitmap, as is recommended from Autodesk itself. It will give us the most optimal result. Specular Level map controls the intensity of highlights and the light bounce amount. So the white areas will reflect and bounce off the light while black areas of the map won’t be affected by light. Glossiness map controls which areas of the map will be more glossy and which are not depending of the color intensity of the map. Black areas means that the surface will produce the full glossiness, while the white areas remove glossiness completely. So now when we know what they actually do let’s make it. We can simply achieve it by first desaturating our Reflection map. To do it in Photoshop go to Image-> Adjustments-> Desaturate. Click it and your image now should be desaturated. Once it is done go to Image-> Adjustments-> Levels. Click it. Inside the dialog box, set black color input level to 150, leave gray color to 1.0 and set white color input level to 200. Click OK. And so we have created the Specular Levels and Glossiness map. Save this texture to project files folder as the previous ones. Name it Wood_Spec_Gloss as you will be using the same texture to both Specular Level and Glossiness map slots. (Do not close the saved texture window as we will use it for creating other maps).
Creating Bump Map
Bump map makes the mesh that is applied to look like it has some bumpy, irregular surface. White areas appears to be raised and black areas seems to be lower, concave. We will very easily make a Bump map just by tweaking our previous Wood_Spec_Gloss texture map. In Photoshop go again to Levels dialog box. Image-> Adjustments-> Levels. Inside Levels set black color input level to 160, leave gray color at 1.0, set white color input level to 190. Click OK. As you see the image is now more brighter. The black is blacker and the white is whiter. That way the bump effect will be more intense. And we have created our Bump map. Save the texture to the project files folder Screnassets->Images under the name Wood_Bump.
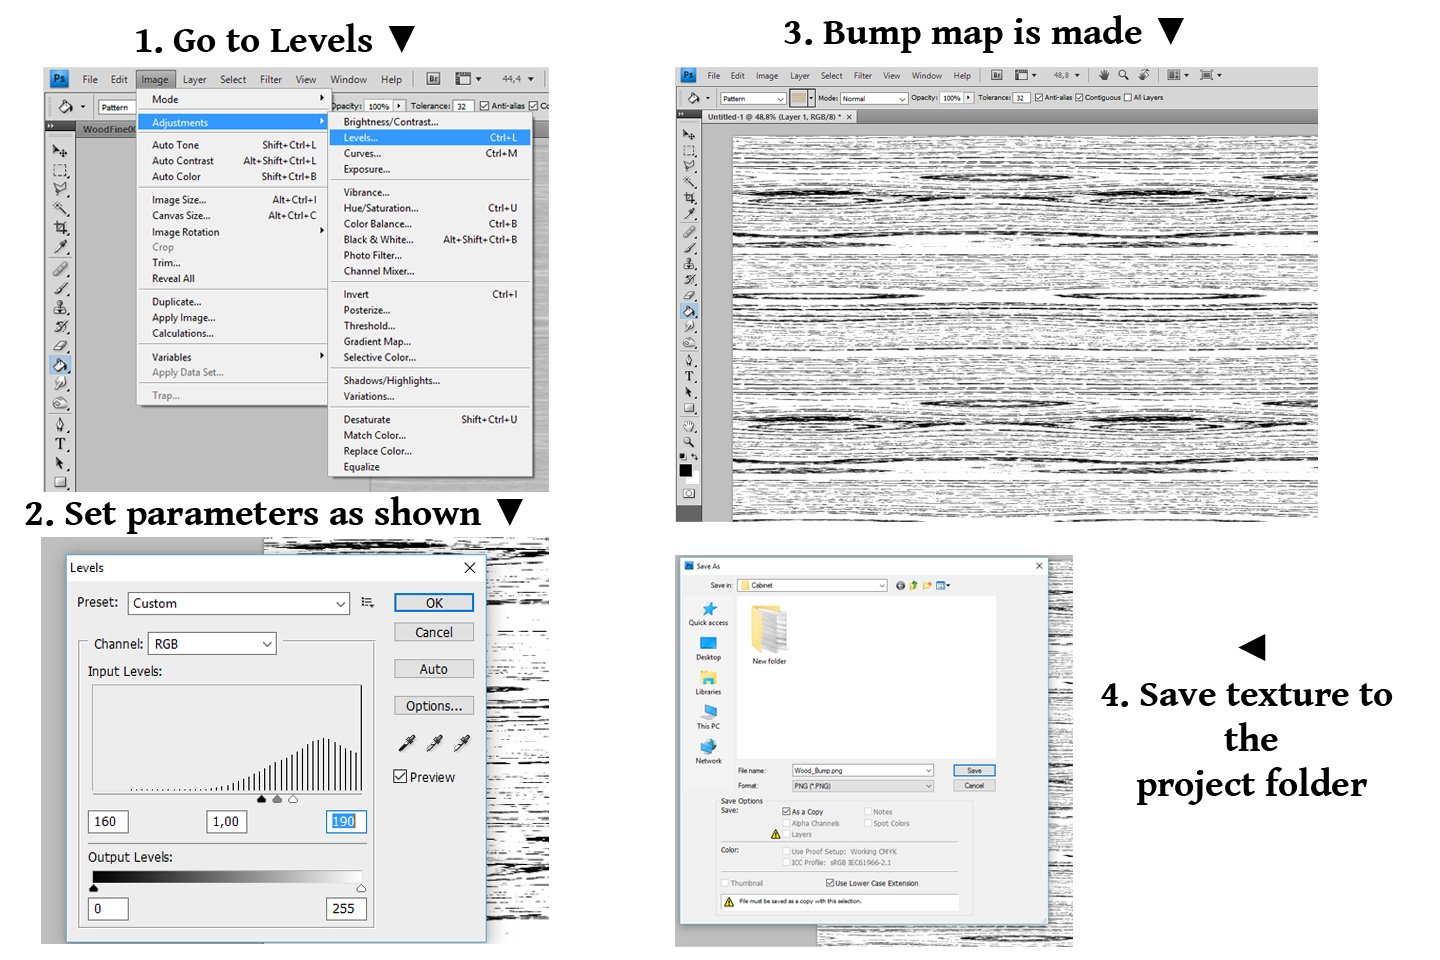
So we are done with the textures we need for creating our Standard Wood Material. You can always set other values inside Photoshop to see what works best for you on different maps. Always experiment and find your own best solution. But for now I will leave my textures as we did them. I hope you have the basic understanding on how the different maps work and what effect they have to the applied objects . So finally we can move on to the actual creation of Standard Wood Material.
You are more than welcome to Subscribe to my website for more simple tutorials!

Share Me!
10 thoughts on “Standard Wood Material in 3ds Max Tutorial Part 1 (Creating Textures)”
This actually replied my problem, thank you!
You’re welcome! Glad I could help 😉
Thank you for giving the information. It’ll help me bunch.
I’m glad I could help 😉
Hello! I simply would like to give a huge thumbs
up for the great info you’ve here on this post. I’ll be coming back to your site for more soon.
Thanks! 😉
i want to thank you for all the information that you offer in your site
Glad you found it helpful 😉
Thanks, this site is extremely beneficial
Cheerz!