
Creating Vray Glass. 3ds Max Tutorial
So it is time for another simple 3ds Max tutorial about a very simple thing- Vray Glass 🙂 I know it is very basic and boring, but for those of you that are just beginning your 3D journey this kind of stuff (basic tutorials) is very needed, I know, I was there too 🙂 Glass is one of those materials that is constantly needed and you always end up making something that requires this transparent shiny material 🙂 So in this simple tutorial I will try to touch all of the important aspects creating Vray Glass material.
Let’s Begin. Setting up visual helpers
First of all when you open your 3dsMax open the Render setup dialog and change the Renderer from Default Scanline to Vray (my version is 3.2). As we are creating Vray Glass it is good to sett your Vray Renderer from the beginning. Otherwise you won’t be able to use the Vray materials, but I guess it is pretty obvious.
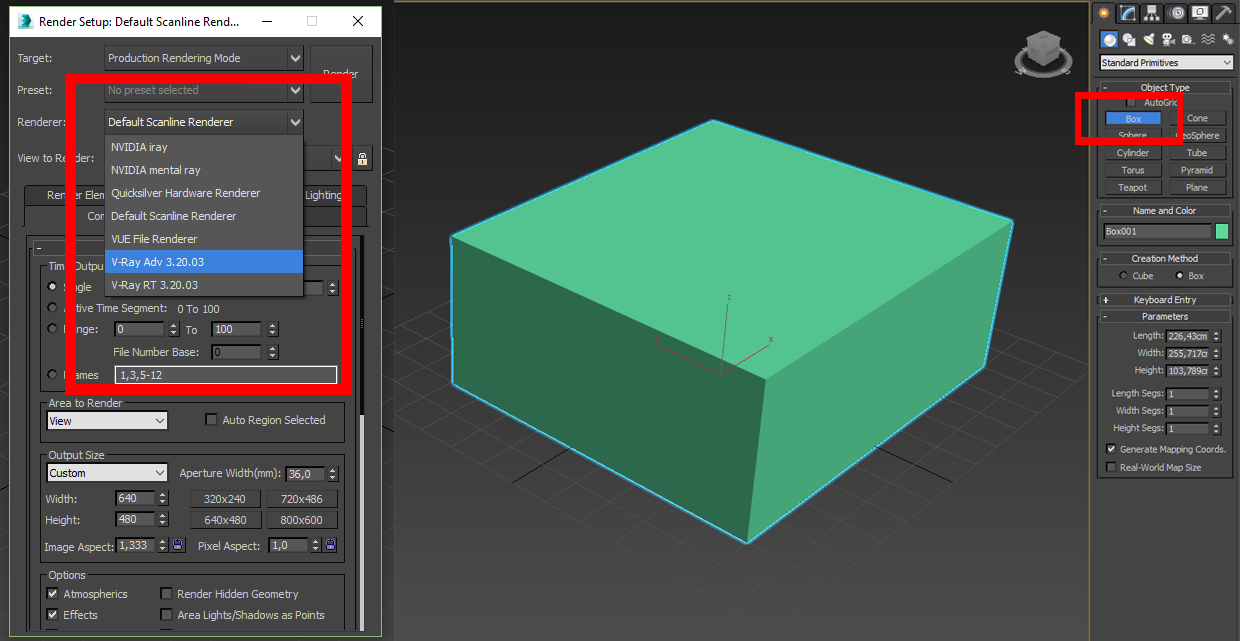
For more visually appealing view I will model this nice “house” (another fabulous 3D mansion of mine…) of the simple box mesh with the one window. It’s not necessary, but I will do it for the sake of better understanding on what’s going on.
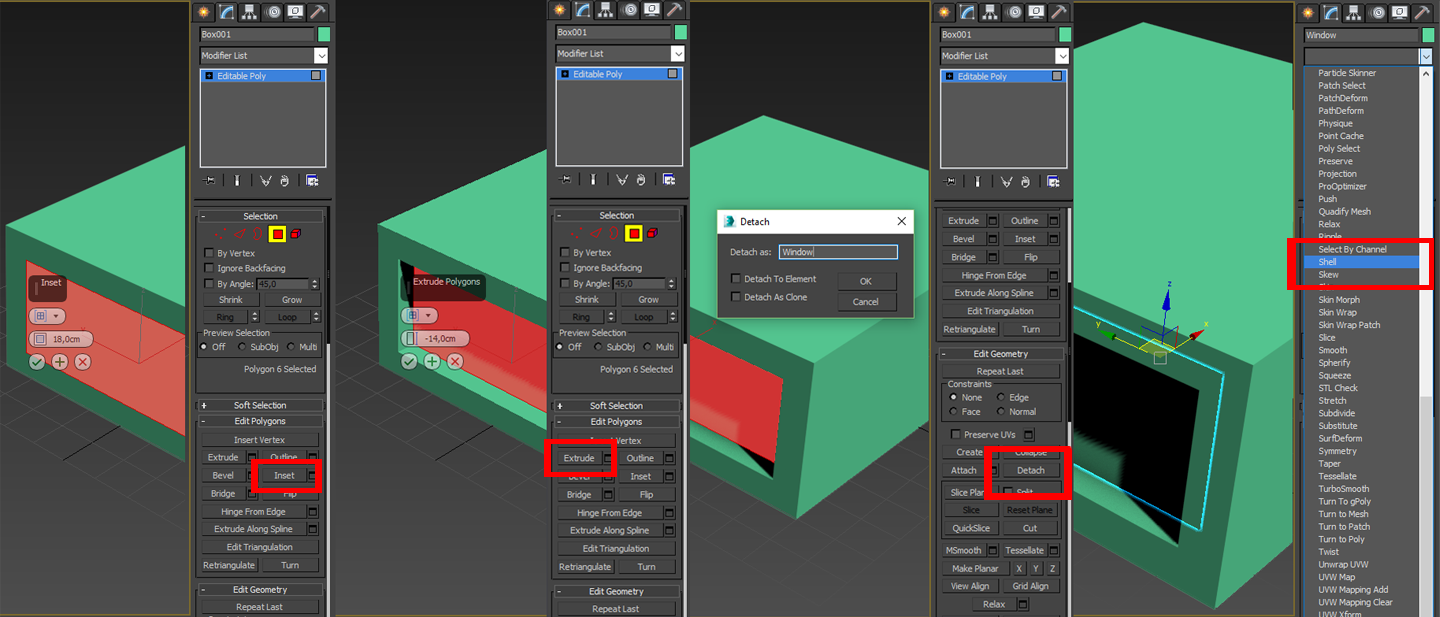
Once you placed your box mesh click the Right Mouse button on the mesh and go to Convert to: Convert to Editable Poly. In the modify panel switch to Polygon mode and select one of the side polygons. In Edit Polygon rollout press Inset and inset the polygon to about 18,0 cm (If your units are inches or default units set it to whatever it looks best to you). Once you’ve done that don’t deselect the polygon just go right back to the Modify panel and again in Edit Polygon panel select Extrude option. Extrude the selected polygon to something like 14,0 cm. With the extruded polygon still selected go back to Modify panel and under Edit Geometry select Detach button. Deselect any options (Detach to element or Detach as clone) if there is selected any of them and rename your object to Window. Click OK and now we have two separate objects: a box mesh and a window (rename the box mesh to House if you want). One more thing is to give our Window (and a house itself) a Shell modifier. Select the Window object and go to Modify panel. In the Modifier List look for a Shell modifier and click on it once you find it in the list. Leave default settings as they are. (Do the same to a House mesh) We need this Shell modifier for the demonstration of one additional Vray Glass feature I want to show you. I will write a bit later about this in the post.
Creating Vray Glass Material
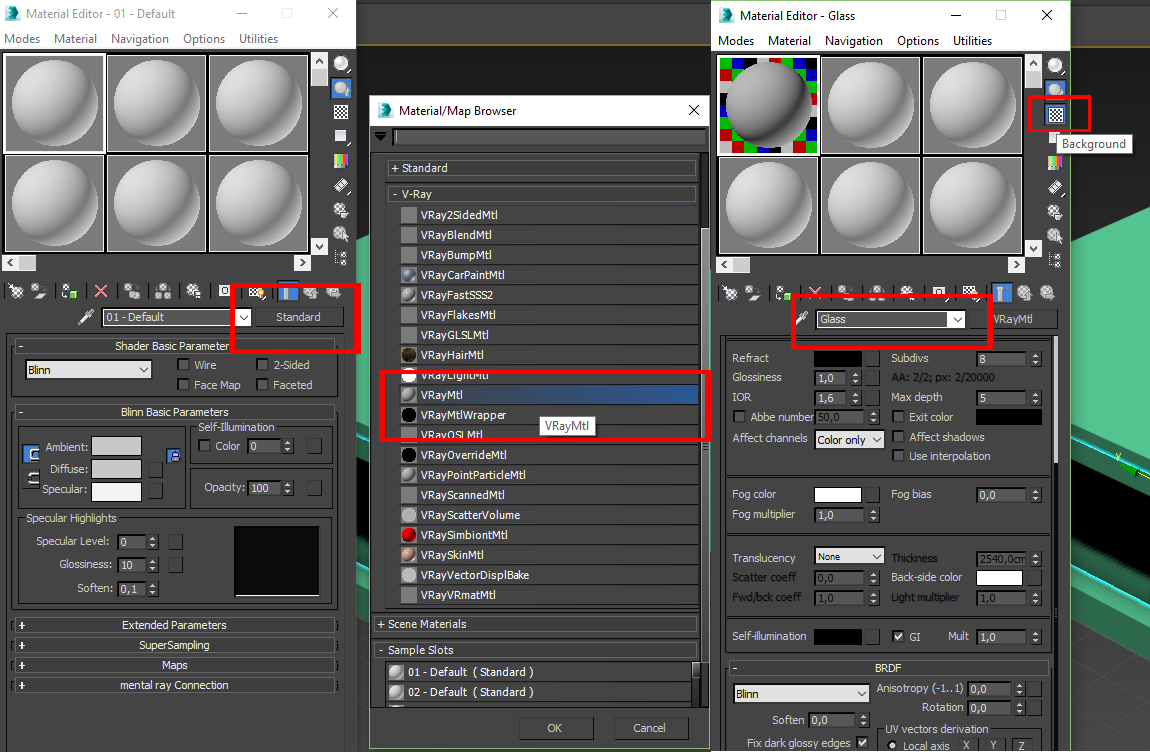
Once we have our helper objects in place let’s create the Vray Glass material. First of open the Material Editor window (M on keyboard). Click on Standard and from the Vray Material rollout select VRayMtl and rename the material to Glass. It is a good habit to rename your material just as you start to create them. We should give our material a background so we can see the change of material in the Material thumbnail as we tweak it (You can double click on the material to make the view pop up). So on the right side of the Material editor window click this Checkerboard looking button and you will see our Glass material Thumbnail change. We can start to create the Vray glass material (finally) 🙂
Setting up Transparancy
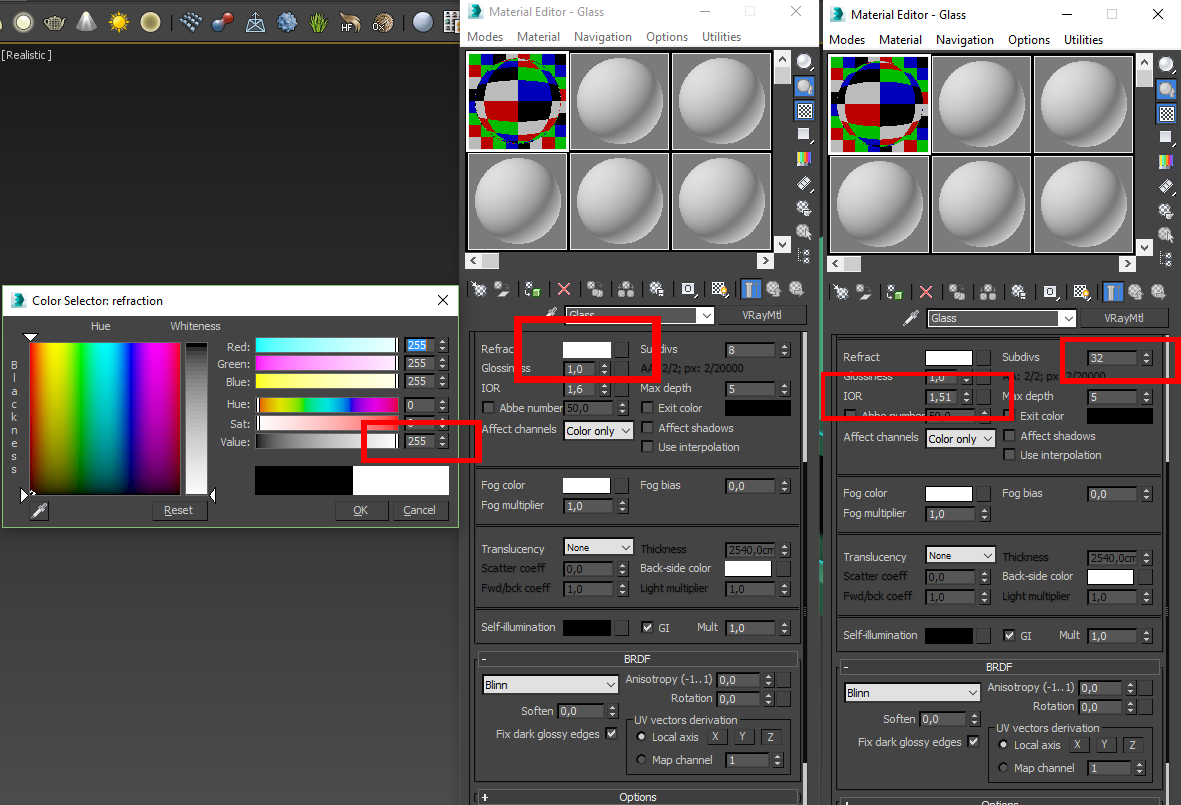
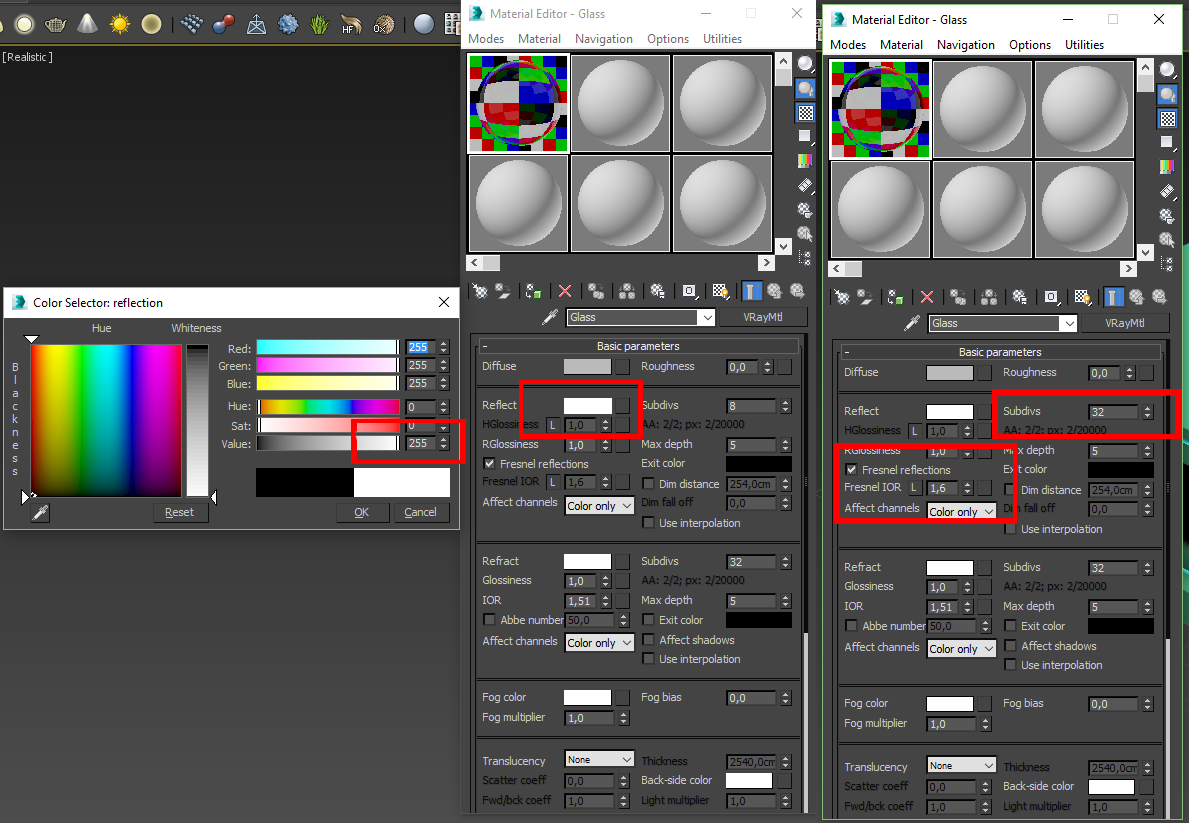
Let’s take care of our materials Transparency first. Click on the Refract color and set the Refraction Color Value to 255 (Absolute White Color) and click OK. This makes our material totally transparent (like, you know, totally,you know, right? Transparent… *must read in this voice 😀 Sorry, can’t help myself). So let’s get back on track. So our material is transparent now. Next thing is to set our IOR (Index Of Refraction) transparency value. By default it is set to 1,6 but let’s make it to 1,51. I googled this stuff. You can do it too, there are bunch of Vray IOR lists for Transparency as well as Reflection values. Next thing is to increase the Subdivision number. I usually make it at least to 16. I’ll make mine to 32 this time. It makes the material more crisper, less noisy and overall better looking once it’s rendered. Most of the time I make the Subdivs to 64:) But remember once you increase the Subdivision number it slows down the rendering process a lot. But if you’re going for quality you have to sacrifice the time most of all 🙂 That’s how it goes usually.
Setting up Reflection
Let’s set our Vray Glass Materials Reflection. Let’s roll back up a bit in the Reflection section (the rhymes on point… ). Click on Reflection color and set the Value to 255 (again pure white). If you would render the material now it would look awfully unrealistic, It would have the mirror like reflections, which is not OK when you are making a glass material. So to correct that we need to enable the Fresnel IOR. Click the “L” button and leave the IOR value to 1,6. Fresnel makes the reflections visibility change according to the viewing angle. So this makes the reflections look subtle and realistic. Now let’s increase the Subdivs value to 32, the same as we did to Refraction. The reason is the same. Better render quality.
Affect Shadows Option
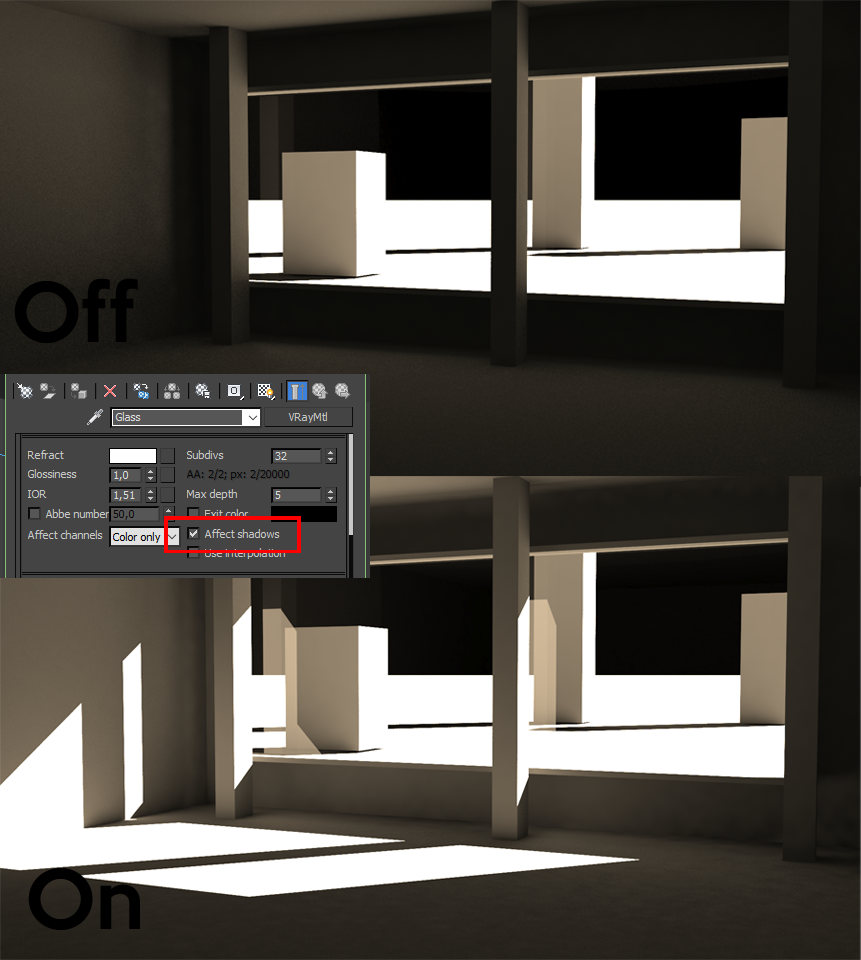
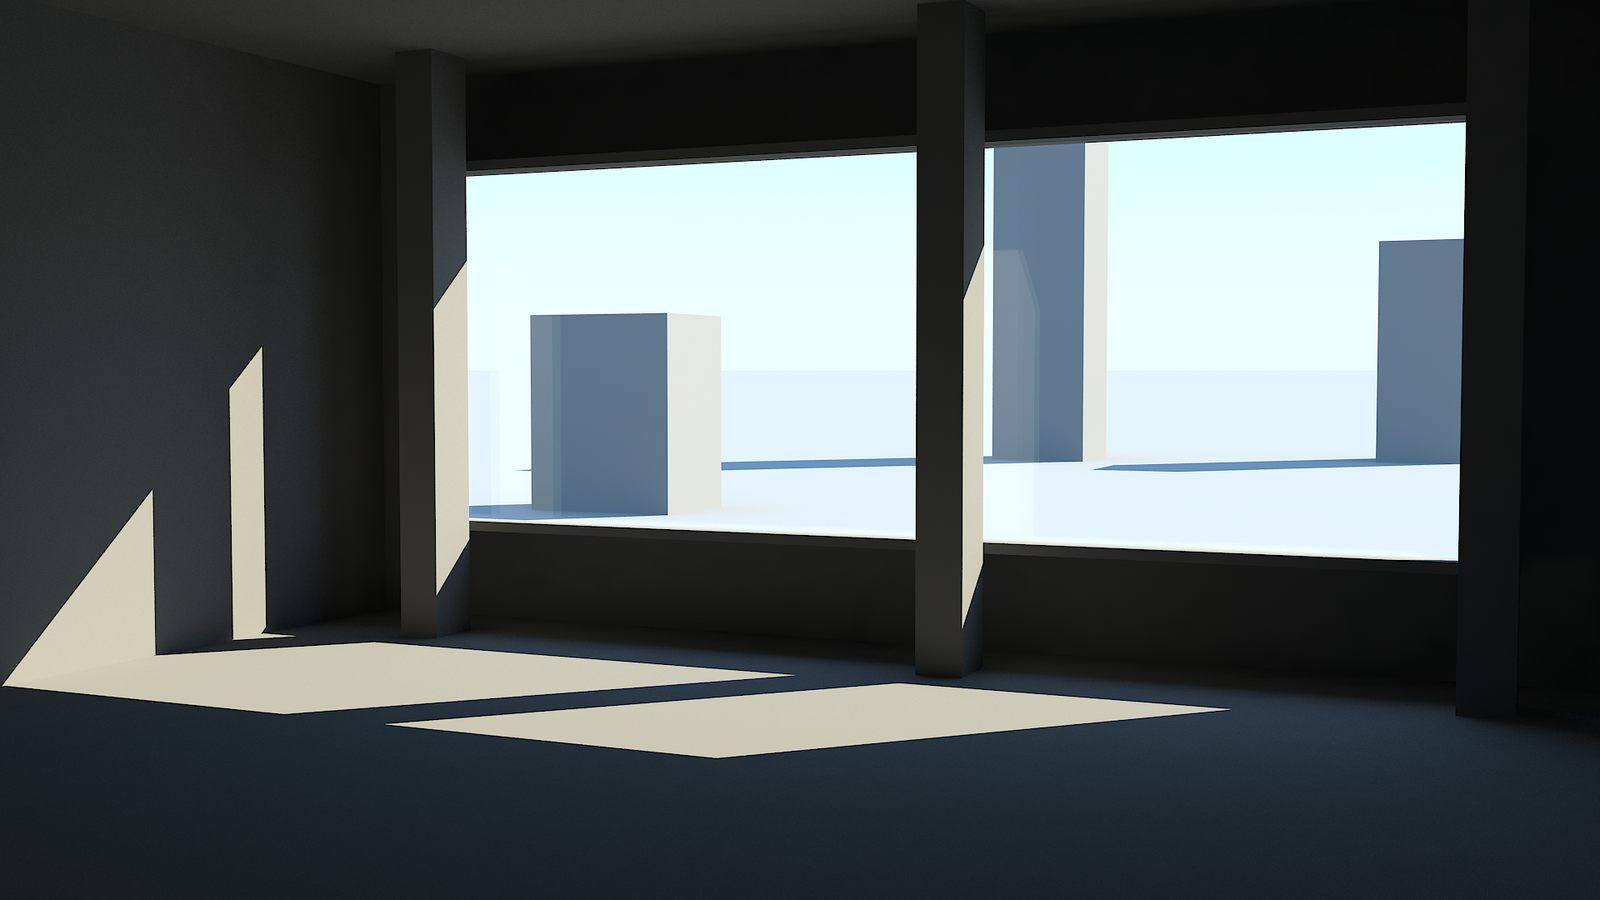
Affect Shadows option is very important and you should never ever forget to check it when you are making any glass material. Especially when you make a window glass material and are doing a interior render. I had quite a struggle some time ago when I go stuck exactly with this thing. So I will explain this very simply, as I understand it. This option allows the light to come trough the glass itself. The sunlight or any other light source will be visible and will make these nice highlight and will illuminate your interior scene. I hope you got it 🙂 here are the pic to demonstrate it better.
Additional Tweaks
Max Depth Option
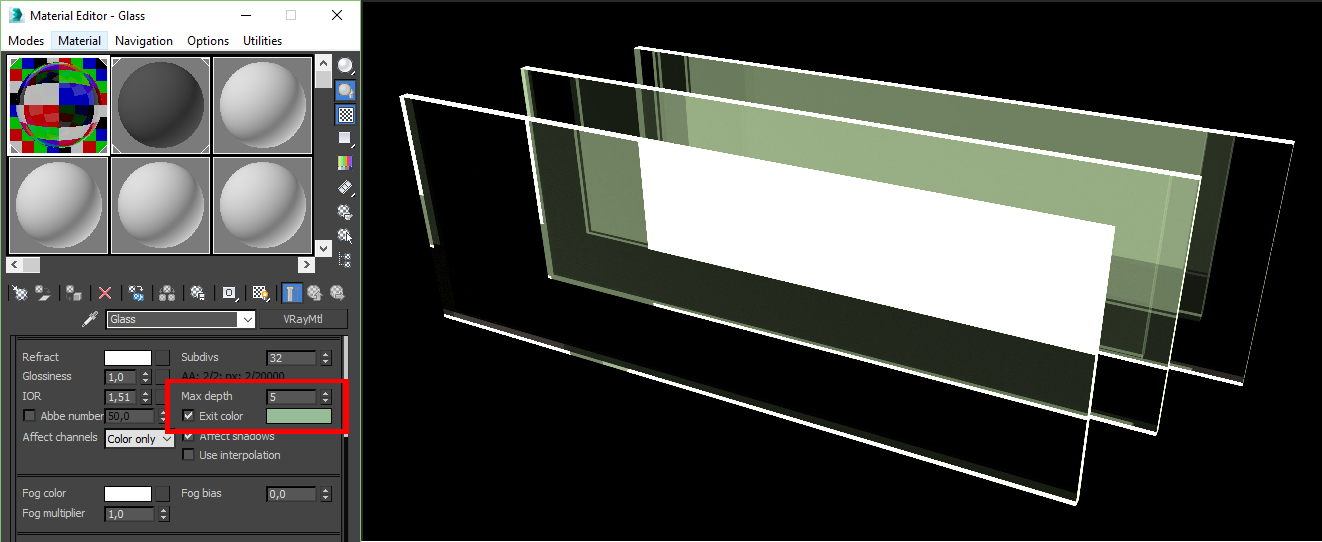
This option is important if you have lot of glass in your scene. I will try to explain as best as I can. This option determines the number of times rays can be refracted. Does this make any sense?.. By default the Max Depth is set to 5 so as I understand it If I put a row of 5 planes with Glass material applied I will get normal and nice refraction results and all of them will be trancparent once I render them. If I will put a 6th plane in the row it won’t be transparent anymore. So if you have lots of reflective or refractive surfaces in your scene you might want to up the value of Max Depth to get proper results, otherwise you won’t be happy with your renders. Please note that you must check the Exit Color option to see the best the meaning of Max Depth option.See the image.
Exit Color Option
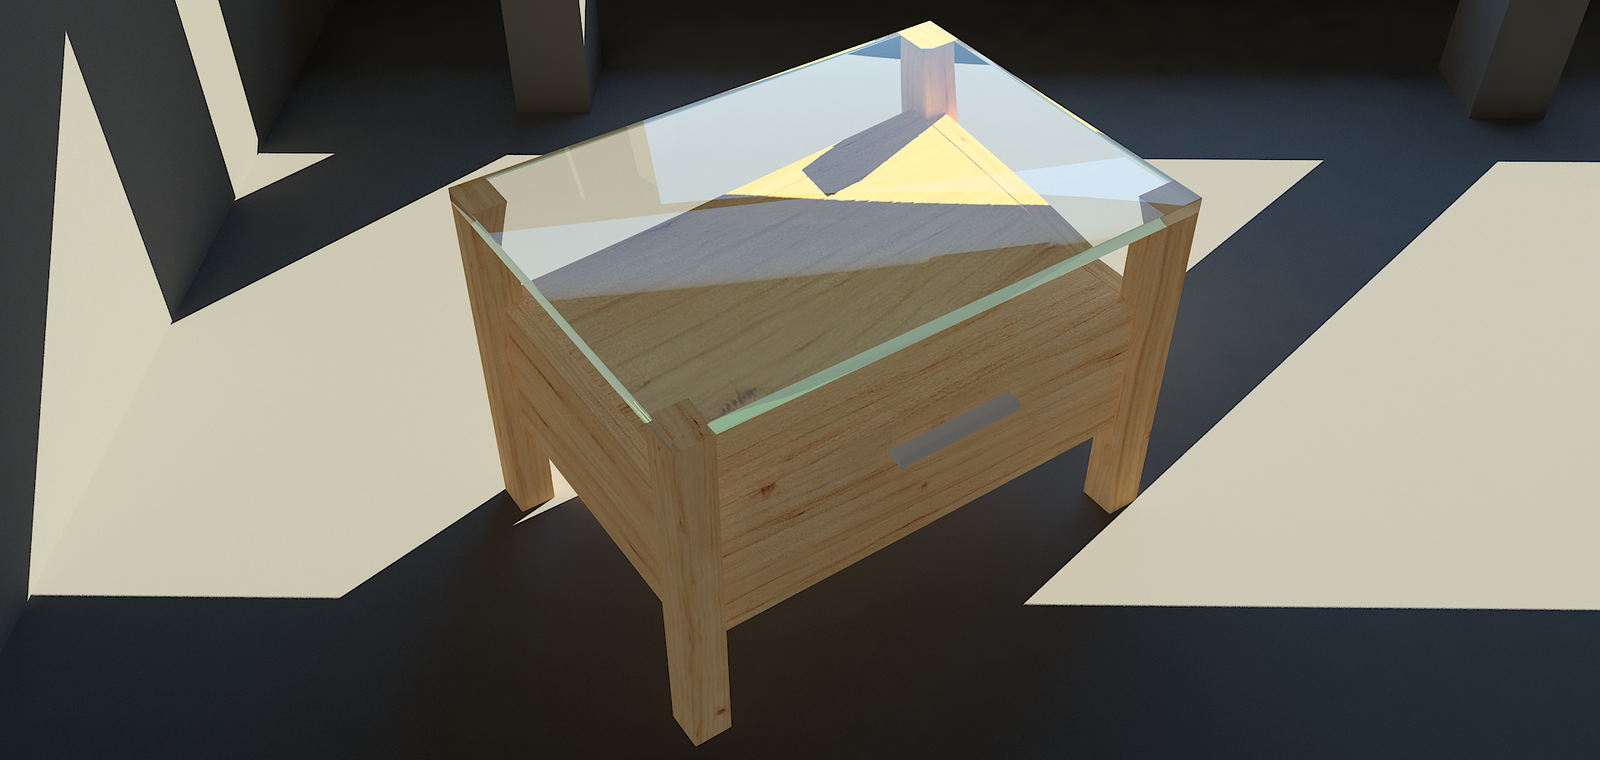
So the Exit Color option is important if you need to set a correct value of Max Depth to your Glass material, but otherwise you won’t be needing it a lot, but it is a nice feature when you make, say a glass shelf. I don’t know if you ever noticed but the glass shelves (in reality) has this green color around the edges where its cut. What am I saying it has a green Exit Color. So if you want to add a realism to your rendered glass object check the Exit Color box and make a slightly green color (or any other color you like just to see what it does) to see the outcome. See the picture.
Adding Vray Sun, Physical camera and additional object for a better outcome
So after doing all these steps we finished our Vray Glass material!(woohoo!) We can apply our material to our Window object and try rendering it. If it is enough for you can stop reading now, because our Vray Glass is done and you can skip the nest part of my post 😀 but if you’re up for some more visual fun then keep reading. So I want to add some additional stuff to our scene like Vray Sun, Physical Camera and add some other objects to the scene for a better outcome effect 🙂
Vray Sun
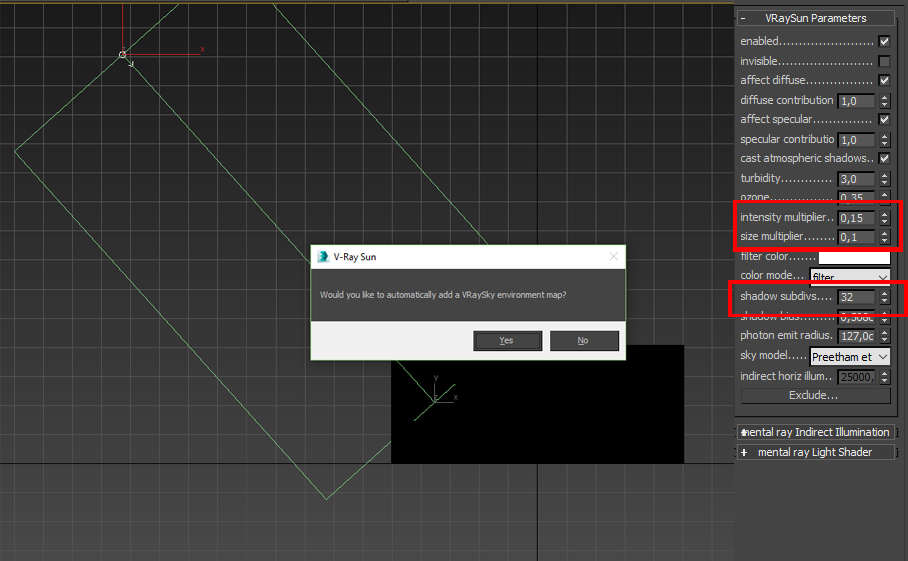
So firt up I set up my Sun that it would shine directly to my Window, but just a bit from the side. Please note, once you set up a Vray Sun the dialog window will immediately pop up asking if you want to automatically add a Vray Sky map for an environment map. Just click OK. For now Vray Sky will do just fine. Once you’ve done that set the Sun Intensity to 0,05 and Size to 0,1. It will be enough for our scene. Set Shadow Subdivs to 32.
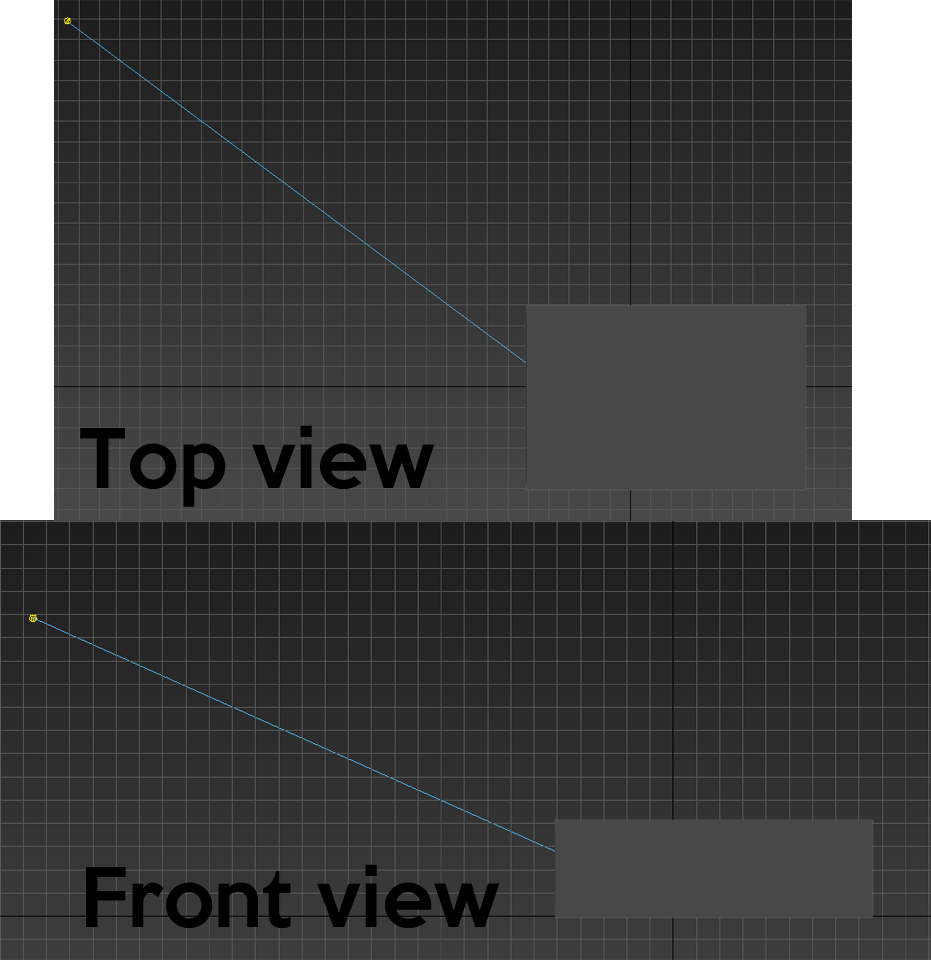
Physical camera
Set a Physical camera in your scene. I did set mine inside the House. So I could show you the nice glass render from inside. I didn’t change any parameters inside apart from correcting the width of the Physical camera.
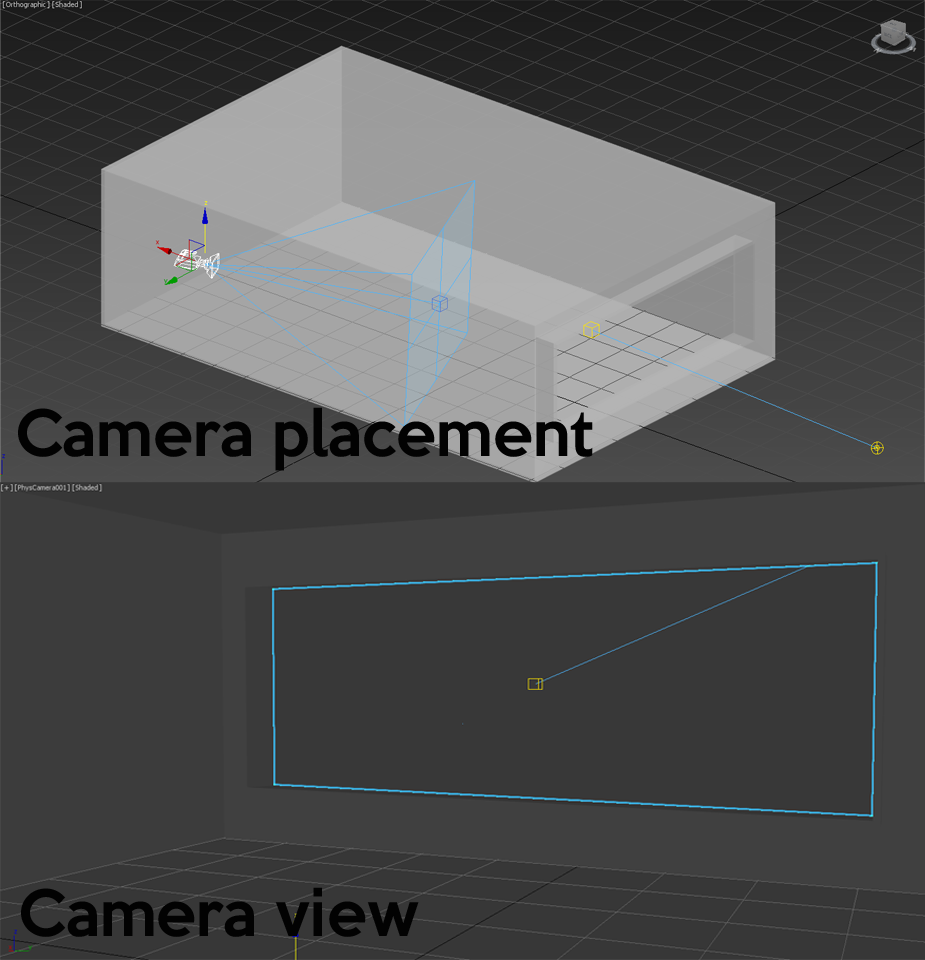
Vray plane and additional boxes
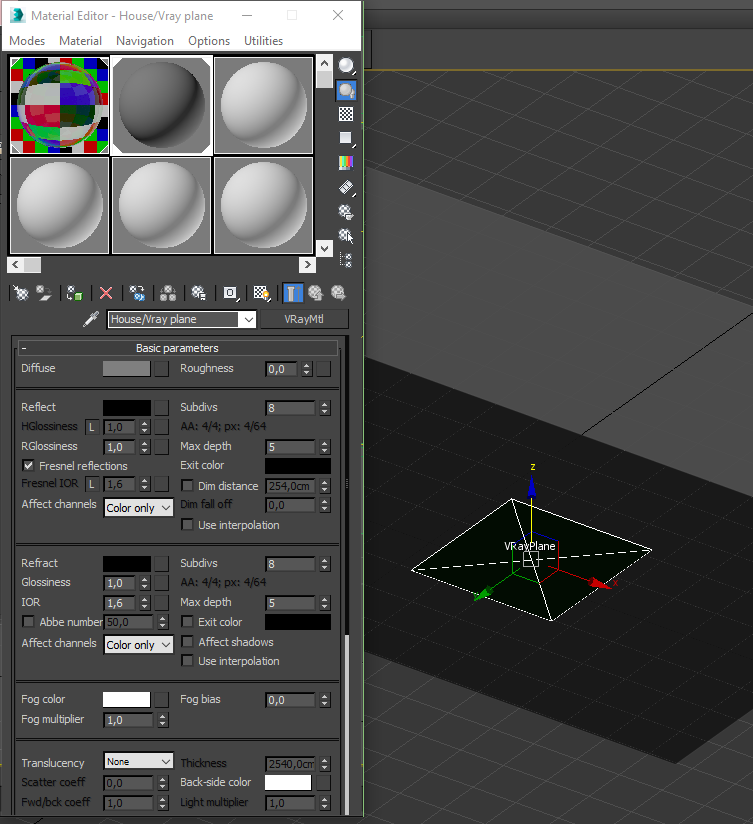
I will add a Vray plane under our Home so it would give us a better perspective of the view. Don’t forget to apply a basic Vray material to your Vray plane as well as a house itself. I made it a dark grey color and just applied it to the objects without any tweaking. And I will add some random boxes just in front of our window and inside the House, because Why not? 🙂 give them the same Vray material as for Vray plane and House.
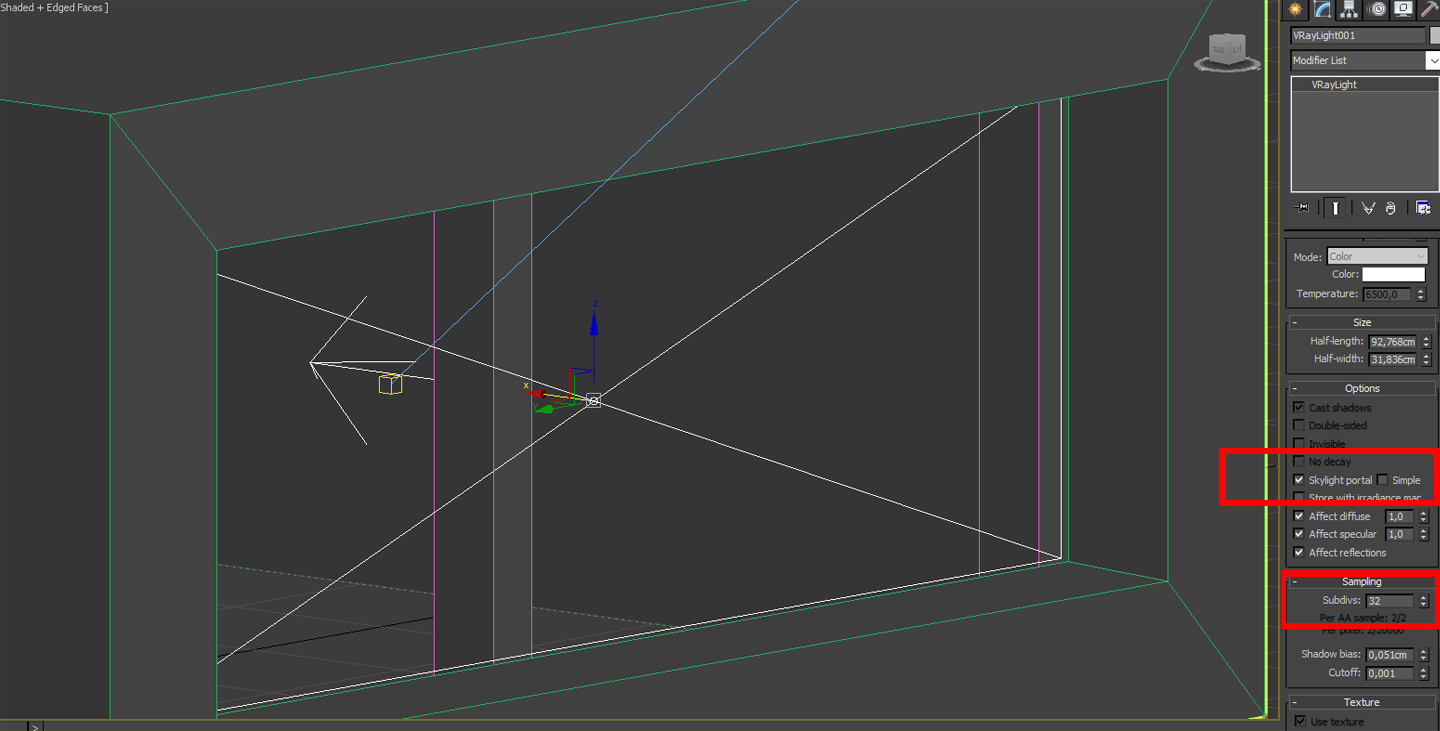
Vray Plane Light. Skylight Portal
I want to add a last asset to the scene which is a Vray Plane Light and make it set as a Skyportal. Make a Vray Plane Light an exact size as our Window and place it inside of our Home so that the Vray Plane Light would face inwards. Place it just a bit before the Window itself. In the Settings panel under the Options rollout check the Skylight Portal box and set the Sampling Subdivs to 32. What Skylight Portal does is it gives this natural lighting to the scene it brings this blueish color to the lighting. The name is self explanatory really. It takes part of the light from the Vray Sky map and transfers it through the plane we set. Please note, it won’t work without a Vray Sky map.
Reder Setup
And the last thing we do is set up our Renderer settings. See the image below. I just did few changes, left everything on default.

And the two final Renders
I did this random cabinet render to see better how the Vray Glass material looks applied on the object. The render settings are the same. So the quality is not the best, but you can see the basic view.
So that is it. We did create a Vray Glass Material and even built some basic scene to see the results better (a waste of time). I hope it was helpful to some of you. As always thanks for reading my weekly nonsense and Subscribe if you like what you read!
Go make some Glass now 😉

Share Me!
15 thoughts on “Creating Vray Glass. 3ds Max Tutorial”
Wow. Thanks a ton mate. really helped me!
Glad I could help 😉
Now this is a tutorial. I came here to get settings for a simple glass material but ended learning why the settings are as said. Great explanation.
Hey, David, thanks 😉 Happy I could help!
this article contains a bunch of info. thnkx it is freakin awesome 🙂
No problem! 🙂
Simple, fast and efficient tutorial!
Thanks so much!
– An exhausted architecture student posting this at 2am 😉
Hey, Arn! I’m glad I could help;) Believe me I know the “exhausted” part all too well 🙂 it comes with occupation… 😀 Best wishes!;)
You’re welcome! 😉
u rgreat
thanks 😀
Very fast and clear tutorial!
Thanks a lot!
Appreciate so much!!
No problem! Cheers! 😉
nice tutorial simple but meaningful explanation thanks
good buddy….